This crochet bell sleeve top is perfect for summer, combining elegance and comfort in one chic design. If you’re looking for a fun crochet challenge that results in a stunning garment, this tutorial is for you! Follow along to learn the essential steps and stitches to create this airy crochet top with beautiful bell sleeves.

Required Materials
- Medium-weight cotton yarn in your color of choice (approx. 150g)
- Crochet hook suited for your yarn
- Scissors
- Stitch markers
- Measuring tape
Step 1: Take measurements
Start by measuring to ensure the perfect fit. Take measurements of your bust, desired top length, and sleeve length. This helps adjust the pattern to fit your preferences.
Step 2: Follow the pattern
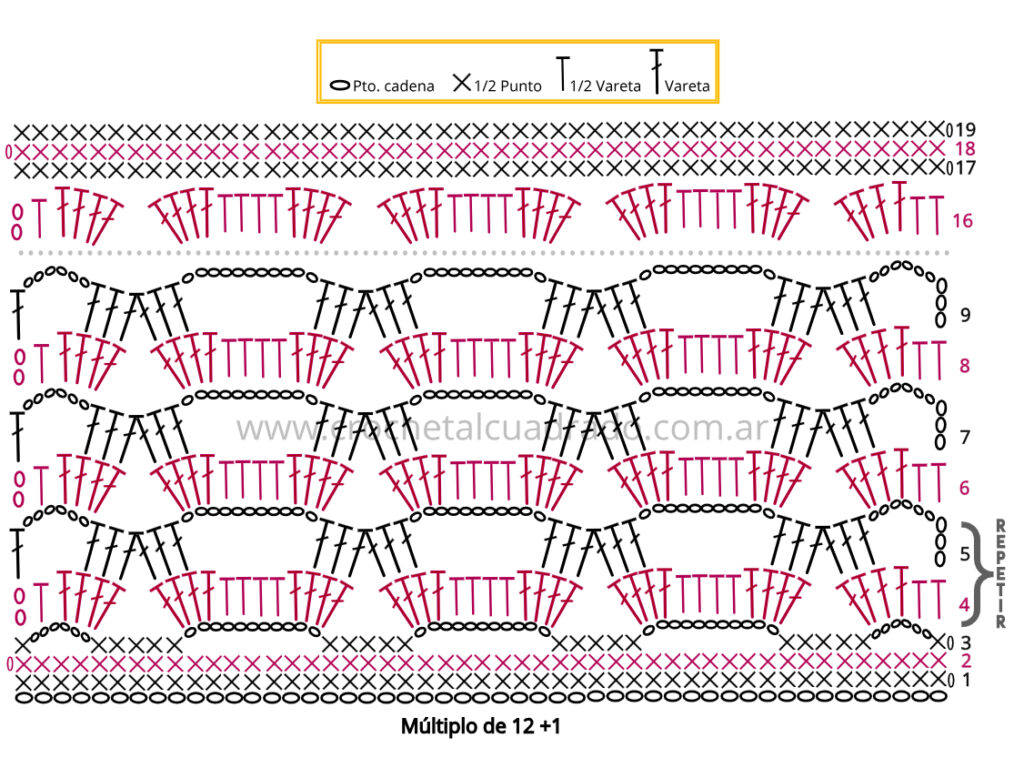
After measuring, check out the stitch diagram and read through the pattern instructions. Make sure you understand the stitches before starting.
Step 3: Crochet the Top
Begin by crocheting the front and back panels of the top, carefully following the pattern. Pay close attention to the openwork stitches to achieve that beautiful, airy design. Use stitch markers to keep track of pattern repeats.
Step 4: Work on the Bell Sleeves
After finishing the front and back panels, move on to the bell sleeves. Follow the pattern to create the sleeves, increasing stitches as needed to achieve the desired flare. Customize the sleeve length to your preference!
Step 5: Assemble and finish
Once both sleeves are completed, sew the sleeve edges and sides of the top.
Step 6: Block the Top (Optional)
Blocking the top after assembly gives a smooth, polished look. Blocking helps even out the stitches and shape the garment beautifully.

Instructions for the Airy Crochet Top (Front and Back)
Start with a foundation chain in multiples of 12 + 1. For this example, begin with 61 chains.
Row 1: Chain 1, work a single crochet in the second chain from the hook, and continue to single crochet across for 61 stitches. Chain 1, turn.
Row 2: Repeat Row 1.
Row 3: Work 1 single crochet, chain 6, skip 3 stitches, then {5 single crochets, chain 11, skip 7 stitches} repeat 4 times. Chain 6, skip 3 stitches, 1 single crochet, turn.
Row 4: Chain 2, work (1 half double crochet, 4 double crochets) in the previous row’s chain-6 space. In the chain-11 spaces, work {4 double crochets, 4 half double crochets, 4 double crochets}, repeating 4 times. End with (4 double crochets, 1 half double crochet) in the chain-6 space, half double crochet in the single crochet, turn.
Row 5: Chain 9 (3 chains count as 1 double crochet), skip 2 stitches, {work 2 double crochets, then a decrease, 2 double crochets, chain 11, skip 6 stitches} repeat 4 times. End the row with 2 double crochets, chain 6, skip 2 stitches, 1 double crochet in the turning chain of the previous row, turn.
Repeat Rows 4 and 5 to the desired length.
To Finish the Piece: End with Row 4, then work 3 rows of single crochet for a neat edge. Cut the yarn, leaving about 8 inches to sew the shoulder.
Sew the shoulders to your preferred length for a comfortable fit.
knitted stitch pattern diagram

Bell Sleeve Instructions
Use stitch markers to mark the sleeve width on each side, starting from the shoulder seam.
- Row 1: Start with a row of single crochets along the edge. Ensure the total stitch count is a multiple of 3 + 1, then turn.
- Row 2: Chain 6 (4 chains count as a double treble), skip 2 stitches, {double treble crochet, chain 2, skip 2 stitches} repeat until the end of the row with a double treble crochet in the last stitch, turn.
- Row 3: Repeat Row 2.
Continue Rows 2 and 3 until the sleeve reaches 10 inches from the edge.

Continue with the next rows to assemble the bell sleeve.
Finishing the Bell Shape:
- Row 1: Chain 5 (3 chains as 1 double crochet), double crochet in the last double treble of the previous row, {chain 2, skip 2 stitches, double crochet in the next double treble} repeat until the end of the row with a double crochet in the last stitch. Chain 2, double crochet in the last stitch for an increase, turn.
- Row 2: Chain 5, {chain 2, skip 2 stitches, double crochet in the next stitch} repeat until the end of the row, ending with a double crochet in the 3rd chain from the previous row. Turn.
Repeat Row 2 for the remaining 10 inches of the sleeve length, then finish with a single crochet row for a polished edge.
Crochet bell sleeve top: final steps
- Sew the sleeves and sides.
- Hide and secure any loose ends.
Congratulations! You’ve completed your crochet bell sleeve top. Pair it with shorts, skirts, or jeans for a variety of looks. Don’t forget to share your finished piece and tag me on social media @crochet_al_cuadrado to show off your creativity!
Additional Tips
- Practice Openwork Stitches: Try swatching openwork stitches first to get the right gauge and tension.
- Choose Quality Cotton Yarn: Cotton is cool and breathable, perfect for summer wear.
- Add Personal Touches: Customize with tassels, fringes, or lace appliques for a unique look.
Remember, crochet is a creative journey! Embrace any mistakes, learn from them, and enjoy the process. If this guide helped or inspired you, please share this page to help the blog grow. Happy crocheting!
¡Feliz tejido y hasta la próxima publicación!
¡Si esta nota te ayudó, inspiró o enseñó algo nuevo, compartí esta página con tus amigas crocheteras para que el Blog siga creciendo! 
Share your work!
If you crochet this pattern, follow me on Instagram and tag your finished project! You can find me at @crochet_al_cuadrado or #crochetalcuadrado. I’d love to see your creations!
Like this pattern? If this guide helped or inspired you, feel free to share this page with your crochet friends to help the blog grow!💟
A hug and let’s knit! Love, Myriam.
Pinterest: https://ar.pinterest.com/crochetalcuadrado/
Instagram: https://www.instagram.com/crochet_al_cuadrado/
